Installation and setup guide for the HS-WV100+ Z-Wave motorized water valve
Overview
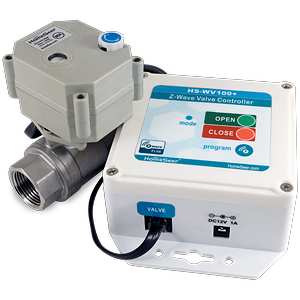
HS-WV100+ is a valve controller system that is designed to control the flow of water when Z-Wave commands are received. It may be used with compatible home automation systems (and sensors) to mitigate water damage when leaks are detected. It may also be used for a variety of other automated or remotely controlled water or irrigation needs.
Applications
-
Use to automatically and/or remotely supply or shut off the flow of water to whole homes, or plumbing fixtures such as showers, toilets, water heaters, washers or sinks.
-
Use to automatically and/or remotely supply or shut off the flow of water to sprinklers or irrigation systems.
-
Protect property against water damage from leaks.
Physical Installation
Install Electronic Water Valve
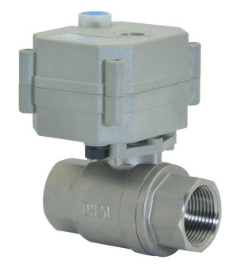
The included electronic water valve must be installed into the existing plumbing. For whole-building protection, the valve should be installed where it can turn off all of the water entering the premises. In a residential setting this is typically on the main water line coming into the house. Variations in plumbing make it impossible to provide detailed instructions for your installation. Your situation may require rerouting the water line, or other changes to your plumbing. It is your responsibility to check with your local codes department to determine if a licensed plumber is required to install the Electronic Water Valve.
CAUTION - Do NOT insert fingers into the valve as this may cause serious injury!
Install HS-WV100+ Z-Wave Water Valve Controller Unit

The water valve controller unit should be positioned near the electronic water valve.
-
Mount the water valve controller to the wall using appropriately sized hardware (not included).
-
Attach the electronic water valve cable to the “VALVE” connector on the water valve controller.
-
Attach the supplied power adapter to the “DC12V” connector on the water valve controller.
-
Power the system by plugging the power adapter into a wall outlet.
Z-Wave Network Installation
Remove the back cover by rotating counter-clockwise and Install 1 CR123A battery (included) inside the unit. Alternately, you may power the unit with a micro USB connection. HS-MS100+ may be included into your Z-Wave network as a “secure” device or as a “non-secure” device. Use the instructions below to include or exclude HS-MS100+ to/from your Z-Wave network.
-
Inclusion
-
Put your home controller into Z-Wave ‘inclusion’ mode.
-
Press the “program” button on the water valve controller unit. Wait for the process to finish.
-
-
Exclusion
-
Put your home automation controller into Z-Wave ‘exclusion’ mode.
-
Press the “program” button on the water valve controller unit. Wait for the process to finish.
-
-
Factory Reset (Use this procedure to reset HS-LS100+ to factory settings when the Z-Wave controller is missing or inoperable).
-
Press and hold the “program” button on the water valve controller unit for 15 seconds. The LED will blink rapidly.
-
When the LED turns off, release the program button. Your water valve controller unit is now reset.
-
Operation
-
Remote Valve Operation (use this procedure for remote or automatic control of the water valve)
HS-WV100+ valve controller behaves like a Z-Wave “binary” device, with “ON” and “OFF” values, when added to most home automation systems.-
Open Valve - Issue “ON” command from Z-Wave controller or Z-Wave compatible home automation system.
-
Close Valve - Issue “OFF” command from Z-Wave controller or Z-Wave compatible home automation system.
-
-
Local Valve Operation (use this procedure for convenient local control of the water valve)
-
Open Valve - Press and release the ’Open’ button on the water valve controller unit to open the water valve.
-
Close Valve - Press and release the ’Close’ button on the water valve controller unit to close the water valve.
-
-
Local Manual Valve Operation (for use in the event of a power failure or water valve controller failure)
-
Open Valve - Pull the thumbwheel on the water valve housing up and rotate wheel counter-clockwise.
-
Close Valve - Pull the thumbwheel on the water valve housing up and rotate wheel clockwise.
-
Z-Wave Association Information
The HS-WV100+ has a single Association Group, Group 1 also known as the “Lifeline” group. Four (4) NodeIDs can be SET into Group 1. Typically the Z-Wave system controller will be the most important member of Group 1.
Specifications
|
Z-Wave Frequency | Range |
908 MHz (US) | Up To 300 Ft line of sight |
|---|---|
|
Valve type |
Motorized Ball Valve |
|
Valve circulation medium |
Fluid, Air |
|
Valve body material |
Stainless steel |
|
Valve life expectancy |
70,000 activations |
|
Valve liquid temperature range |
2°C~90°C |
|
Valve environment temperature |
-15°C~50°C |
|
Valve maximum working pressure |
1.0MPa |
|
Valve max. torque force |
2 Nm |
|
Valve open/close time |
5 Sec |
|
Valve protection class |
IP67 |
|
Power Supply |
12 VDC, 1A, UL (US, Canada), FCC |
|
Valve operating voltage |
DC12V |
|
Valve working current: |
500MA |
|
Certifications |
Z-Wave Plus, NSF |
LED Indicator
|
LED |
Mode |
|---|---|
|
OFF |
Power is off |
|
BLINKS slowly |
Not joined to a Z-Wave network - Press the Z-Wave button to join |
|
BLINKS quickly after pressing Z-Wave button |
Sent a Z-Wave Node Info and attempting to either Include or Exclude from a Z-Wave network. Expires after about 10 seconds if not joined |
|
BLINKs very quickly |
The sensors from the valve are in an invalid state. This happens while the valve is in transition or if there is a fault in t |
|
WINKs ON |
If the LED is OFF most of the time and briefly “winks” ON every 2 seconds, then the valve is CLOSED and the HS-SV100+ is joined to a Z-Wave network |
|
WINKs OFF |
If the LED is ON most of the time and briefly “winks” OFF every 2 seconds, then the valve is OPEN and the HS-SV100+ is joined to a Z-Wave network |
Troubleshooting
|
Problem |
Solution |
|---|---|
|
Not Powering on - No LED lights |
Check outlet for voltage:
|
|
Unable to join to a Z-Wave network |
Perform a Z-Wave Exclusion on the device first, then try re-including. If that fails, press and hold the Z-Wave button for 30 seconds to do a full Reset to Factory Defaults.
|
|
Valve non responsive |
Make sure valve is plugged into Z Wave Valve Controller. If it is still not responding to commands replace valve. |
|
Any other questions |
Contact HomeSeer (HomeSeer.com) |
Limited Warranty
HomeSeer Technologies, LLC will repair or replace, at its option, any part of the device, which proves to be defective in workmanship or material under normal use, in the USA except in the states of Alaska or Hawaii, for a period of one year from the date the device is purchased. During the warranty period, HomeSeer Technologies, LLC will repair and provide all parts necessary to correct such defects, free of charge, provided the device has been operated in accordance with the manufacturer's guidelines. The Customer will return the device to HomeSeer Technologies, LLC for testing and repair or replacement. Should you need service, during warranty period or beyond, contact HomeSeer to obtain return authorization before shipping your device to HomeSeer
Technologies, LLC.
Except for the obligation to repair or replace the HS-WV100+ as stated herein, HomeSeer Technologies, LLC shall not be liable for any incidental or conse-
quential damage caused by failure of the HS-WV100+ to function as advertised or expected.
HomeSeer Technologies, LLC technicians, will provide all warranty service and this warranty is void if the device has been opened or serviced by anyone
other than a HomeSeer Technologies, LLC technician.
EXCEPT FOR THE LIMITED WARRANTY AS STATED IN THIS AGREEMENT, THERE ARE NO WARRANTIES, EXPRESSED OR IMPLIED, BY OPERATION OF LAW OR OTHERWISE. HOMESEER TECHNOLOGIES, LLC DISCLAIMS THE IMPLIED WARRANTY OF MERCHANTABILITY AND FITNESS FOR A PARTICULAR PURPOSE AS TO PRODUCTS AND SERVICES SUPPLIED UNDER THIS AGREEMENT. IN NO EVENT WILL HOMESEER TECHNOLOGIES, LLC BE LIABLE FOR ANY INCIDENTAL, INDIRECT, SPECIAL OR CONSEQUENTIAL DAMAGES, INCLUDING, BUT NOT LIMITED TO, COMMERCIAL LOSS, PROPERTY DAMAGE, LOSS OF USE, LOSS OF REVENUES, PROFITS, OR SAVINGS, EVEN IF HOMESEER TECHNOLOGIES, LLC KNEW OR SHOULD HAVE KNOWN OF THE POSSIBILITY OF SUCH DAMAGES.
HomeSeer Technologies, LLC does not guarantee the leak notification service in regards to notification of leaks. HomeSeer Technologies, LLC is not responsible for any value of water loss, commercial loss or any property damage, or for any other loss or damage caused or incurred as a result of the failure of the device and/or failure of the notification service.
Some states do not allow the exclusion or limitation of incidental or consequential damages, so the above limitations or exclusions may not apply to you. This warranty gives you specific legal rights, and you may also have other rights, which vary from state to state. To know what your legal rights are in your state, consult your local or state consumer affairs office or your state's Attorney General.
Your state laws or local ordinances may require that a licensed plumber perform installation of this device. The manufacturer is not responsible for enforcement of your states law or local ordinances.
Damage limitation warning; In no event shall manufacture be liable for any incidental or consequential damages including water damage, damage to other property by water, loss of use of the product, loss of time, inconvenience, travel expense, lodging expenses, lost by damage to personal property, loss of income, profits or revenues.