Setup guide for migrating from the Z-Wave plugin to the Z-Wave Plus plugin
Overview
This guide details the steps necessary for migration from the original Z-Wave plugin to the newer Z-Wave Plus plugin.
Compatible Systems
This plugin is designed for HomeSeer HS4-powered systems including the following:
-
HomeTroller Pi G3 hub
-
HomeTroller Plus hub or HS4
-
HomeTroller PRO hub or HS4PRO
This plugin is not compatible with HomeTroller SEL hubs nor with HomeTroller S6 hubs (running Win 7) as their operating systems are not compatible with Z-Wave JS UI.
The Steps
To prevent loss of data, be sure to follow the steps below in order and do not skip any!
-
Backup your HS4 system.
-
Method 1 (Recommended)
Navigate to Tools > Backup/Restore
Click the BACKUP NOW button. Wait for the backup to complete. This may take several minutes or more. -
Alternate Method 2 (for Windows systems)
Shut down the HS4 application or stop the HS4 service
From the Windows Explorer, select the HomeSeer HS4 folder, then press Ctrl-C (to copy it) and Ctrl-V (to paste it). This will create a new folder HomeSeer HS4 (Copy) in the same folder as your live HomeSeer HS4 folder.
-
-
Navigate to Plugins > Manage and ensure that you have Z-Wave plugin version 4.1.6.0. If you are using Z-Wave Legacy, you must have 3.0.10.0 installed, then you can upgrade to Z-Wave beta 4.1.6.0 from Plugins > Add.
-
Update your HS4 system to v4.2.22.4 (or later) and restart your system. Then navigate to Setup > General and confirm that your system updated properly.
-
Navigate to Plugins > Add and install the Z-Wave Plus plugin v1.1.13.0 or later but do not enable it yet.
If you have trouble locating the plugin, make sure the Show Beta Plugins switch is enabled on the plugin list.
-
Before disabling the v4 Z-Wave plugin, navigate to Plugins > Z-Wave > Advanced Functions and run a Node Test. Review your results. If any nodes fail, you must correct this before attempting to convert to Z-Wave Plus. Failed nodes will not convert properly to Z-Wave Plus.
-
Disable the existing HS4 Z-Wave plugin, then enable the Z-Wave Plus plugin and wait for the new plugin to fully initialize.
-
Navigate to Plugins > Z-Wave Plus > Manage Networks, then click the ADD NEW NETWORK button.
-
In the Add a Z-Wave Network stepper, select Automatically as the Instance Type and click CONTINUE.
-
Create a Network Name. We recommend entering SmartStick or Z-NET to keep things simple unless you have multiple controllers in your system.
-
Select the Connection Type, enter its settings, then click CONTINUE.
-
USB - for most Z-Wave USB stick controllers
Then choose the serial port assigned to your USB stick -
Network (TCP) - for network connected controllers
Then enter the URL for your network connected controller -
Z-NET - for HomeSeer Z-NET controllers
Then select the Z-NET from the drop down list -
Internal - for HomeTroller Pi hubs with internal Z-Wave controllers
Then select the serial port assigned to your internal controller
-
-
For the Security Keys Configuration, choose Import security keys from legacy Z-Wave plugin and click CONTINUE
-
The Verify step will summarize your settings. If everything looks correct, click CONTINUE. If not, click the BACK button(s) and edit the settings as needed. A successful network creation will yield a message like this:

-
Once the network has been created, click FINISH. Z-Wave Plus will then begin to scan your controller to identify the Z-Wave devices in your system.
If you have multiple Z-Wave controllers in your system, repeat this process starting at step #5 above.
-
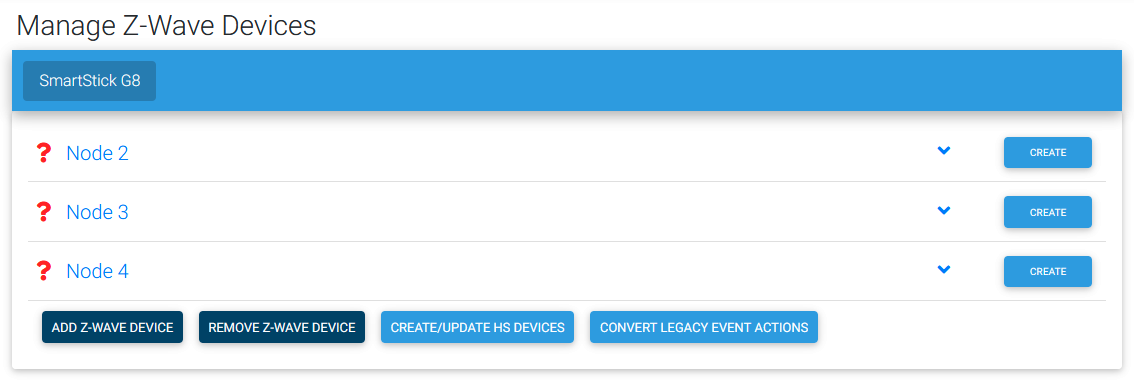
Navigate to Plugins > Z-Wave Plus > Manage Devices. This will display a list of your devices that have been or are currently being scanned by Z-Wave Plus. Devices that are currently being scanned but have not yet been identified will only display as node numbers and will have a red question mark like this:
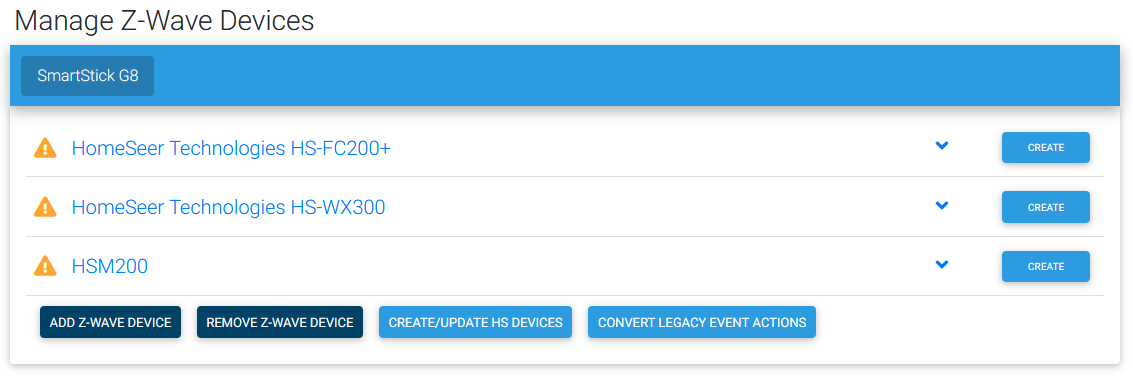
Devices that have already been scanned and identified but have not yet been linked to HomeSeer devices will display with some combination of model numbers and manufacturer names and will have a warning sign like this:
-
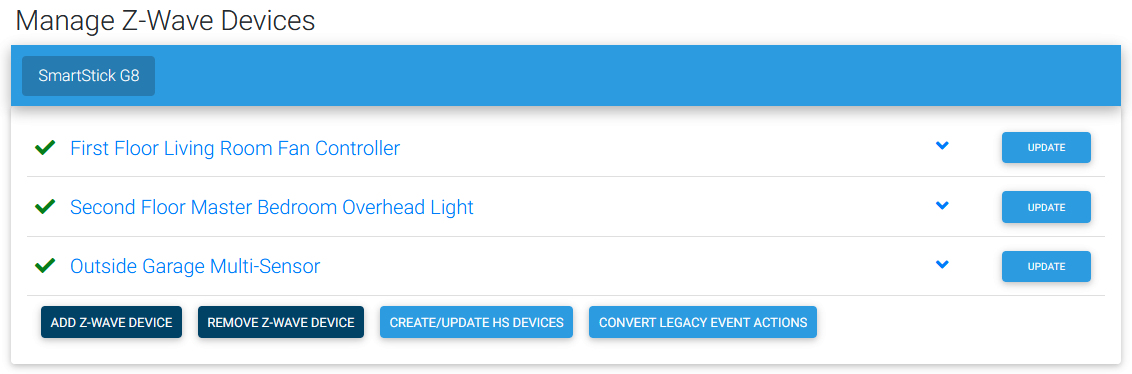
From this screen, click the CREATE/UPDATE HS DEVICES button. This will link your newly created devices to your existing HomeSeer devices. Devices that have been linked will display with their HomeSeer device and location names and will display with a green check mark like this:
Most battery operated devices will take some time to fully convert as they must be woken up for this to happen. In most cases, they will wake up automatically based on their wake up interval setting. However, if you wish to accelerate this process (or if the wake up interval is disabled), you can manually wake them by pressing their Z-Wave network buttons. Be sure to click the CREATE/UPDATE HS DEVICES button again after your devices have all been scanned and identified.
-
Final step: click the CONVERT LEGACY EVENT ACTIONS button to update your Events with Z-Wave Actions to work correctly with Z-Wave Plus.