Setup guide for the Tuya software plugin
Overview
This plugin is designed to allow HomeSeer HS4 to monitor and control Tuya WiFi devices.
Compatible Devices
-
Tuya WiFi switches and lighting devices
Requirements
-
Tuya WiFi devices
Setup
-
Install and enable the Tuya plugin
-
You will see a prompt to "Go to the Authorize page for initial setup." This is a hyperlink, click it and you will be brought to a setup screen for the plugin. Alternatively, navigate to Plugins > Tuya > Authorize.
-
After reading the description in step 1 and setting up your devices in the Tuya app on your phone, click Continue.
-
Select the appropriate region you are located in, then click Continue.
-
Click the Tuya Authorization Page link, then log in with your Tuya account. Whether you are logging in with your email address or phone number, you will want to make sure that the country code is set correctly. Click Confirm Authorization.
-
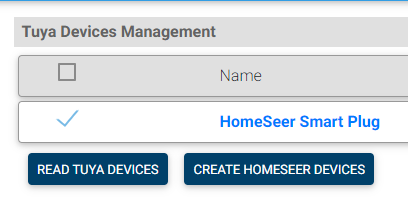
You will then be brought back to the HS4 web interface, click Finish and you will be given a list of your Tuya devices to be added to HS4. Check the devices you would like to add or use the Select All box at the top, then Create HomeSeer Devices.
-
You will receive a pop-up indicated that the devices have been created, then you can click Devices and start controlling your hardware! If you do not see devices listed here, try using Read Tuya Devices to see if they then get loaded in.
Managing Devices
If you add more Tuya devices to your home, those can easily be added by navigating to Plugins > Tuya > Manage Devices. From here, click Read Tuya Devices. This will scan your Tuya account for any devices you have added. You can then click the check boxes to the left of your devices' names, then use the Create HomeSeer Devices button to add them to your Devices page.
When clicking on a device on this page, you will be brought directly to that device on your Device list.
Local IP Address
-
Requires version 4.0.29 or later of the Tuya plugin
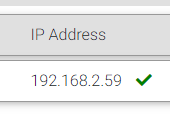
The local IP Address of compatible devices will show up in the respective column. If a checkmark is present, the device is locally connected. This means that the device is communicating directly to HomeSeer and not going through the Tuya cloud. Local Control allows for a more secure connection and reduces dependency on the Tuya cloud. If no IP address is showing, you may need to adjust your Windows firewall settings; skip to the section below.
Windows Firewall Settings
On Windows systems, you may need to modify your firewall settings to enable local control to work properly. On Linux systems such as the HomeTroller PI you do not need to modify the firewall.
If your Windows Defender Firewall is enabled (or any third party firewall) you will need to open some ports for local control to work properly.
-
Open the Windows Defender Firewall control panel
-
Click Advanced settings
-
Select Inbound Rules in the left pane and then click New Rule... in the right pane. The New Inbound Rule Wizard will pop up.
-
Click the Port radio button, then click Next
-
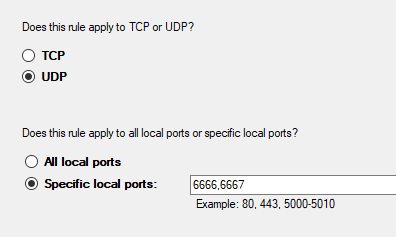
Click UDP, then type 6666, 66677 into the Specific local ports: field, then click Next
-
Click Allow the connection, then click Next
-
Leave the the Domain, Private and Public rule options checked
-
Name the rule Tuya Inbound Ports and click Finish
-
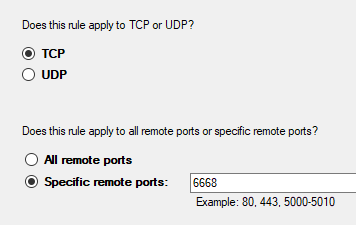
Now, repeat the process but create an Outbound Rule instead for TCP port 6668
-
Name this one Tuya Outbound Port and click Finish
When viewing your Tuya devices from the "Manage Devices" menu in the Tuya plugin you should see the IP address of your device. If the IP address is not displaying, try the following:
-
Power cycle the Tuya device
-
Select "Manage Devices" from the Tuya plugin menu then click the "Reload Devices" button. This will start the discovery process so the plugin can find the devices IP address.
Settings
-
From Plugins > Tuya > Settings you can adjust the polling interval in the General tab, or adjust the logging settings in the Logging tab. It is not necessary to adjust any of these settings unless instructed by technical support.