Setup guide for the Z-Wave Plus software plugin.
Overview
This plugin is designed to allow HomeSeer HS4 to monitor and control Z-Wave devices using ZWave JS.
Compatible Systems
This plugin is designed for HomeSeer HS4-powered systems including the following:
-
HomeTroller Pi hub or HS4-Pi
-
HomeTroller Plus hub or HS4
-
HomeTroller PRO hub or HS4PRO
This plugin is not compatible with HomeTroller SEL hubs nor with HomeTroller S6 hubs (running Win 7) as their operating systems are not compatible with Z-Wave JS UI.
Compatible Devices
-
This plugin supports thousands of Z-Wave devices. The complete list is available here: https://devices.zwave-js.io/
Requirements
-
HomeSeer Hub or HS4 Software
-
Z-Wave Plus plugin v1.1.13.0 or later.
-
Compatible Z-Wave adapter (HomeSeer SmartStick G8, Z-NET G8, Z-NET PRO, or just about any other 700 or 800 series USB stick controller available)
Add a Z-Wave Network
Complete the steps below to add a Z-Wave network to your HS4 system.
-
Install and enable the Z-Wave Plus plugin using the procedure outlined in Installing Plugins
-
Navigate to Plugins > Z-Wave Plus > Mange Networks and click ADD NEW NETWORK.
-
The Add a Z-Wave Network will appear. Follow these steps:
-
Instance Type: Leave set to Automatically* and click CONTINUE
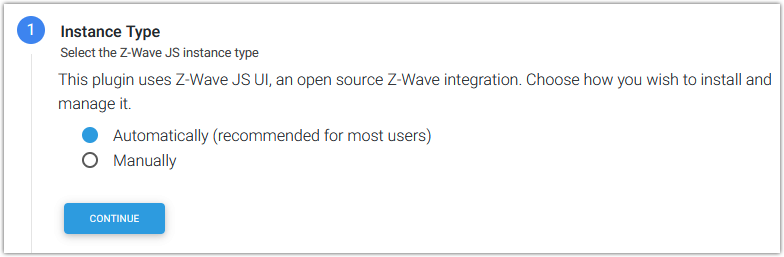
*If desired, it is possible use a Manually installed instance of Z-Wave JS UI but HomeSeer does not provide support for that procedure.
-
Settings:
-
Network Name: Enter a network name of your choice. If unsure, just enter “SmartStick”, “Z-NET” or something similar.
-
Connection Type: Select from the following:
-
USB - Most Z-Wave USB stick controllers
Then choose the serial port assigned to your USB stick -
Network (TCP) - for network connected controllers
Then enter the URL for your network connected controller -
Z-NET - for HomeSeer Z-NET or Z-NET PRO controllers
Then select the Z-NET from the drop down list -
Internal - for HomeTroller Pi hubs with internal Z-Wave controllers
Then select the serial port assigned to your internal controller
-
-
RF Region: Select the region that you’re in or are closest too (typically). This will determine the frequency that your Z-Wave network will operate on.
-
-
-
For the Security Keys Configuration, choose from the following, then click CONTINUE
-
Generate random security keys
Select this if you’re building a Z-Wave network from scratch
-
Import security keys from legacy Z-Wave plugin
Select this if converting from the legacy Z-Wave plugin to Z-Wave Plus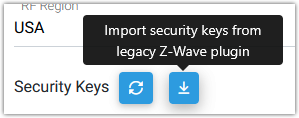
-
Enter security keys manually
Select this if moving a Z-Wave network from another system to Z-Wave Plus
-
-
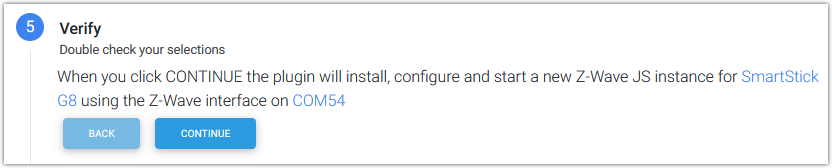
The Verify step will summarize your settings. If everything looks right, click CONTINUE. If not, click the BACK button(s) and edit the settings as needed.
-
Once the network has been created, click FINISH.
Menu Options
All menu options of the Z-Wave Plus plugin
-
Add Device Information on adding Z-Wave devices to your network
-
Remove Device Information on removing Z-Wave devices from your network
-
Manage Devices Information on the Z-Wave Plus Manage Devices function.
-
Manage Networks Information on managing Z-Wave networks in the Z-Wave Plus Plugin
-
Device Diagnostics Information on using the Z-Wave Plus Device Diagnostics tool
-
Update Firmware Information on using the Z-Wave Plus firmware update tool
-
Advanced Functions Information on using the Z-Wave Plus Advanced Functions tool
-
Manage Locks Information on using the Z-Wave Plus Manage Locks feature
-
Manage Associations Information on using the Z-Wave Plus to Manage Z-Wave Associations
-
Z-Wave JS Front-End Information on accessing the Z-Wave JS Front-End from Z-Wave Plus
-
Settings Information on using the Z-Wave Plus Settings