Add Interface
Information on adding Z-Wave interfaces to your HomeSeer platform.
Overview
Whether you are setting up your HomeSeer system for the first time or have a new Z-Wave interface to expand your existing system, your interface will need to be added and initialized in HS4 before Z-Wave devices can be added to it. The steps below are appropriate for both new and existing systems.
Procedure
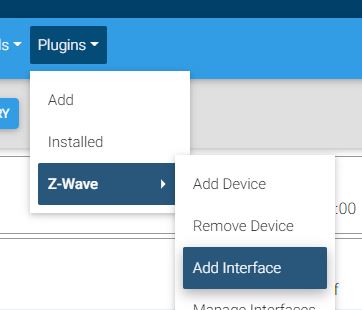
- Navigate to Plugins > Z-Wave > Add Interface
- Click the "New Interface" field, then enter a name for your interface. It is a good idea to enter a name which tells you what interface you are working with at a glance. Some examples are "HomeTroller SmartStick" or "Living Room Z-Net". Click Continue.
- You will be prompted to select the Interface Model out of a drop-down menu. Select the appropriate interface model for the hardware you are using. Click Continue.
- Select a port out of the options given in the Serial Port drop-down menu. If you are unsure of the port, trial and error will not break your hardware and is recommended. Click Add.
- The interface will be added, then started. You are now ready to add devices!
If the process fails, you will be prompted to check the Manage Interfaces page at Plugins > Z-Wave > Manage Interfaces.
Notes
If you are adding an additional Z-Wave interface to an existing setup, HomeSeer recommends letting each interface manage its own network. By default, adding an interface creates a new network for it so there is no extra setup required. You will want to add Z-Wave Devices that will be installed nearest a given interface to that interface's network.
If you are adding an interface which already has a network to a new system and do not have a Z-Wave backup, you can use the Import Node Info from Controller and Scan Devices action.