Updating Z-Wave Firmware for Z-NET or SmartStick
Information on updating the Z-Wave SDK firmware on the SmartStick+ Z-Wave USB stick or Z-NET Z-Wave network adapter
Overview
This firmware update is for the HomeSeer SmartStick+ G3 700 series USB stick or Z-NET network interface. This update fixes network delays that have been observed with earlier firmware. If you are seeing delays in your network you are welcome to update to this version and we welcome your feedback. Our testing so far seems to show that the delays are now gone.
Requirements
- HomeSeer SmartStick+ G3 700 Series Z-Wave USB Interface or HomeSeer Z-NET Z-Wave network interface
- A Windows PC running Windows 10 (only Windows 10 has been tested, other versions may or may not work)
- If updating a SmartStick, this PC must have at least one free USB A port
- Z-Wave Core Plugin v3.0.9.0 or Z-Wave HS4 Plugin v4.0.3.0 (or higher)
- On the Windows PC where you will be inserting the SmartStick+ G3, you may need to install drivers. The drivers are available here: https://homeseer.com/current-downloads/
Procedure
Please read these instructions carefully before updating your stick. Note that the following instructions reference the UI in the Z-Wave Core plugin. If you are running the UI plugin, you still have access to the same functions but the UI will be different.
Download PC Controller with Firmware and extract the files to a Windows PC. This can be the PC running HomeSeer or another PC. The zip contains a folder named "pc controller" and a file with a .GBL extension. The GBL file is the firmware update file and the pc controller is a tool you will use to apply the update to your SmartStick or Z-NET.
SmartStick Z-NET - Backup your Z-NET or SmartStick+ node information
- If using Z-Wave HS4 Plugin v4.0.3.0 (or higher): Follow the instructions in this doc: Backup Interface
- If using Z-Wave Core Legacy Plugin v3.0.9.0: Go to the Z-Wave Plugin Controller Management page and select the "Back up this Interface" option from the "Actions" menu. This will back up the nodes in your interface in case you need to restore them later. The update will not delete your nodes so you do not need to do a restore.
- It is also a good idea to back up your HomeSeer install. In HS4 select Backup/Restore from the Tools menu and then click the "BACKUP NOW" button. If you are on windows, you can also simply backup your entire HomeSeer folder.
- You will now need to update the stick. If you are running Windows and want to update the stick on your HomeSeer system, shut down HomeSeer. You cannot update the stick if HomeSeer is running. If you are running Linux, remove the stick from your system and plug it into a Windows PC where you unzipped the files.
In the folder where you unzipped the files, run the EXE "ZWaveControllerUI.exe" located in the pc_controller folder.
If you get a "Windows protected your PC" pop-up, click More info, then click the Run anyway button to launch PC Controller.
- Click on the gear icon at the top of the screen.
- SmartStick: This brings up a dialog where you can select your SmartStick G3 USB stick. It will appear with a COM port as the Name and the Description will be Silicon Labs CP210x USB to UART B. Select this and then click OK.

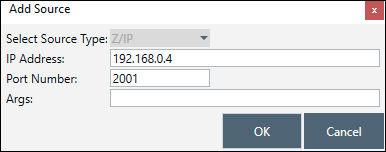
- Z-NET: Click the Add button below and then enter the IP Address of your Z-NET and Port Number 2001 (our default Z-NET port setting). Then click OK.
- SmartStick: This brings up a dialog where you can select your SmartStick G3 USB stick. It will appear with a COM port as the Name and the Description will be Silicon Labs CP210x USB to UART B. Select this and then click OK.
- In the upper right corner of the screen you will see a button labeled "OTW Firmware Update". Click that and it will prompt for a file. Select the .GBL file that was in the download zip.
- The update should start immediately. Once done, unplug the stick and plug it into your HomeSeer system. If you are already on your HomeSeer system, unplug the stick anyway to power cycle it.
Upgrading from SmartStick+ G1 or G2
If you are currently on 500 series SmartStick (G1 or G2) and wish to migrate to the G3 (700 series), follow the instructions above (steps 1 through 7) to first update your G3 stick to firmware version 7.17.1 then follow the instructions below to update your HS system to the new G3 stick.
- In the Z-Wave plugin Controller Management, back up your current stick with the "Back up this Interface" option from the "Actions" menu. Note the filename displayed so you can select this later.
- Disable your current interface by clicking on the green check.
- Unplug your current stick and plug in the new G3 stick.
- The new stick will use a different COM port so refresh the Controller Management page so the COM port drop list is updated. Select the COM port your G3 stick is using from the drop list.
- Now click on the box to enable the stick.
- Restore your nodes to this stick using the "Restore a Network to this Interface" option from the "Actions" menu and select the filename you used when you backed up the old stick. Progress will be displayed.Revert to last published version
- Once the nodes are restored you should disable and re-enable the Z-Wave plugin. Select "Manage" from the "Plugins" menu (HS4) and disable and then enable the Z-Wave plugin.
- Check a device that is close to your interface and make sure you can control it OK. If so, your nodes are restored ok. At this point the interface does not have any routing information so it will most likely have a problem reaching all of your nodes. It is recommended that you NOT optimize the entire network. Pick some 500 or 700 series nodes that are at the center of the your network and optimize those. You can then run the "Test Node Connectivity on a Network" from the Controller Management screen in the Z-Wave plugin to ensure you can reach all of your nodes.
Additional Information
IMPORTANT
Make sure you keep your old 500 series stick powered off. That stick will have the same home ID as the new G3 stick and will cause serious communications problems if left powered on.