Quick Start Guide for HS4
The guide includes the basic steps necessary to get started with HS4 software.
Overview
This guide is specifically for HomeSeer users who are creating their own installations of the HS4 home automation software.
If you purchased a HomeTroller hub, you will not want to install HS4 on your own hardware. Instead, please refer to the Quick Start Guides in the Hub section.
Raspberry Pi Installation
Requirements
- Raspberry Pi2, Pi3, Pi3 B+, or Pi4
- 32GB+ microSD card
- SD card reader
- HS4 software image for Raspberry Pi
- Etcher flashing software
Installation
- Download the HS4-Pi software image from HS4 Release Notes & Downloads. This will be a very large download of a .zip file.
- Locate the file on your PC and unzip it. This may take up to 20 minutes.
Note: If using Mac OS and the unzip results in error, use the unzip command in Terminal. - Download, install, and run Etcher. https://etcher.io/
- Insert a blank microSD card into SD card reader.
- Select the HS4-Pi image file and the correct drive letter of your microSD card. Click Flash. The process could take up to 20 minutes.
- Once the flash completes, remove your SD card and insert into your Pi board.
- Connect your Pi board to your router, power it on and wait for the unit to boot up. This could take 1-5 minutes.
- On another computer, open a web browser and enter find.homeseer.com, then click on the system's name to connect to the HS4 web interface.
- Advance through the registration stepper. Enter your HS4 License ID & Password, then create your HS4 web user account. Follow the prompts and click FINISH at the end.
Note: If you are upgrading from HS3, you will also be prompted for your HS3 license info. - Proceed to Navigation Overview below.
Linux CLI Access
All versions of HS4 should be managed from the web interface. For certain troubleshooting steps, one may need to access the Linux command line interface. For these advanced steps, the default users in this image are:
root / homeseerpi | homeseer / hsthsths4
HS4 (Windows / Linux)
Requirements
- Windows or Linux PC or laptop with 4GB+ of RAM
Installation
- Download and run the installer from HS4 Release Notes & Downloads.
- Launch HS4 and advance through the registration stepper. Enter your HS4 License ID & Password. Create your HS4 web user account. Follow the prompts and click FINISH at the end.
Note: if you’re upgrading from HS3, you will also be prompted for your HS3 software codes. - Proceed to Navigation Overview below.
Navigation Overview
HS4 is a mobile friendly web application that’s designed to be used on any browser-equipped device. All of the essential functions of the program may be accessed from the main navigation bar at the top of the screen.

- Devices: Click here to add, remove and edit your smart home devices. Learn More
- Events: Click here to manage your smart home events (automations). Learn More
- Cameras: Click here to view live camera feeds and to watch recordings. Learn More
- Setup: Click here manage various system settings. Learn More
- Tools: Click here to access or manage timers, counters, backup, log and more. Learn More
- Plugins: Click here to manage HS4 integration plugins. Learn More
Plugins
Plugins are software programs that allow HS4 to integrate with smart devices and technologies. For example, if you’re using a Z-Wave wall switch and a Zigbee door sensor, you'll need to install both the Z-Wave Plus and Zigbee plugins. Visit Setup Guides for Plugins to learn more about setting up our free HomeSeer plugins. To browse the complete list of all plugins, visit the plugins section of our shop. Visit Installing Plugins for more information on adding plugins to your system.
Creating Devices
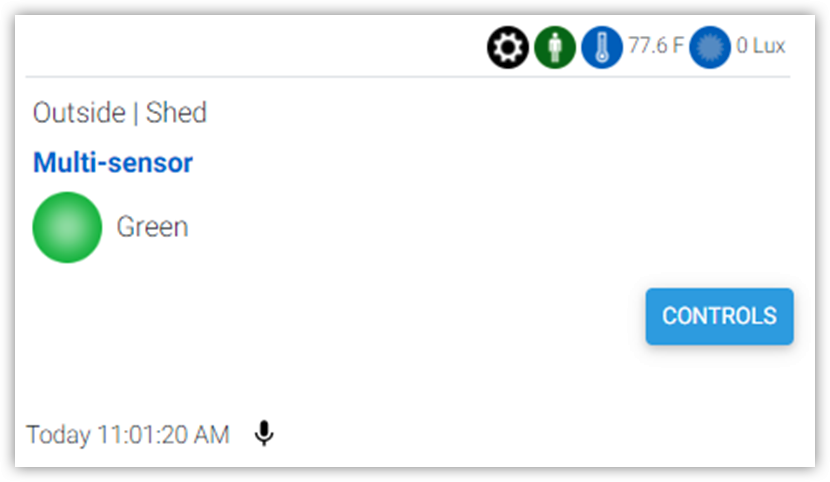
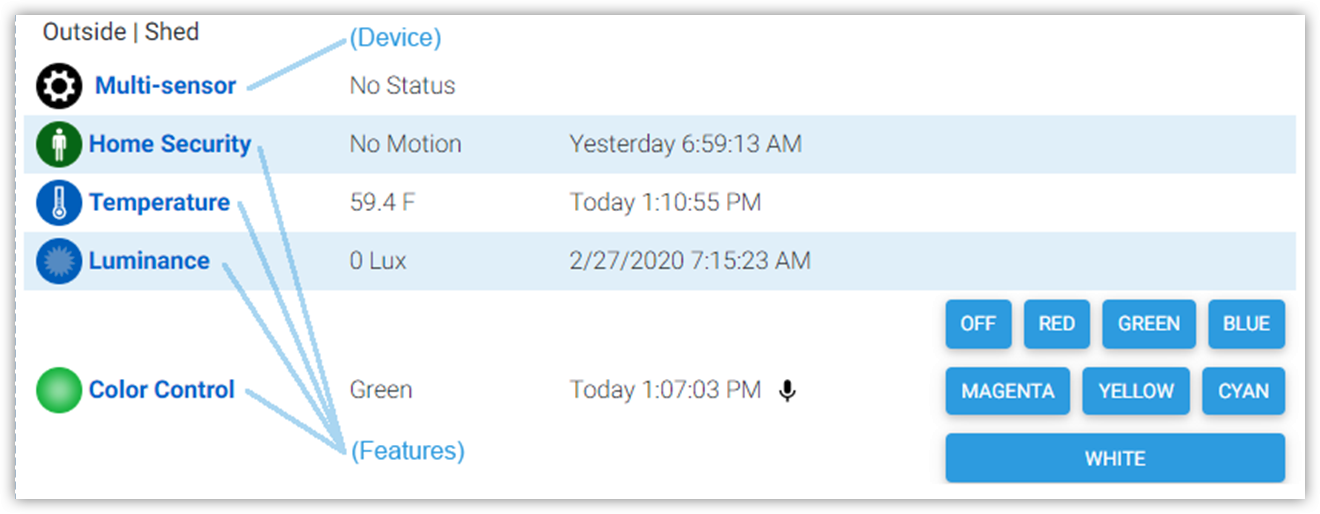
Devices are the fundamental building blocks for any HS4 system. When you add any smart product to your system, a corresponding device is added to the software. Device attributes will display as Features Some features are controllable and some will simply display values or status. When you turn the device on or off, your smart product will turn on or off. Here is what a multi-sensor device would look like in the HS4 device list & grid views:
Grid View

List View

Since devices are added by using the controls and procedures engineered into each plugin, you will need to refer to the plugin documentation for more information regarding this.
For more information, Learn more about devices.
Creating Events
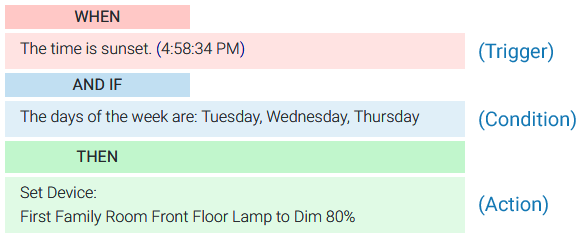
Events are rules that work to automate the smart devices in your home. Each event is comprised of at least one Trigger and one Action. You may also apply Conditions to any trigger. In the example here, a living room lamp is turned on at sunset on Tuesdays.

For more information, Learn more about events.
Using MyHS for Remote Access & Integrations
Our MyHS service provides remote access to your HS4 system and MyHS Premium plans work with other cloud services such as Amazon Alexa, Google Home and IFTTT. MyHS Lite is free to all users. Premium paid plans are also available for users who need additional features. Learn More About MyHS Premium.
Registering a New Account
- Visit myhs.homeseer.com and click Register. Use the SAME email address & password as your HS4 web user account. Enter your HS4 license ID and password. This will become your primary license.
- You will receive a verification email with a link inside. Once you click this link, you will be able to log in and connect via the MyHS web page. If you do not receive the email check your SPAM folder.
Updating an Existing Account
If you already have a MyHS account (for HS3), you can update that account for HS4 with the steps below.
- Visit myhs.homeseer.com, enter your credentials, then select Manage Account.
- Click Change Primary System. Select this and you will be prompted for your old license ID and password combo as well as the new one. If you do not recall your license ID and password, that information can be recovered in the Software Licensing Issues section.
HomeSeer Mobile App

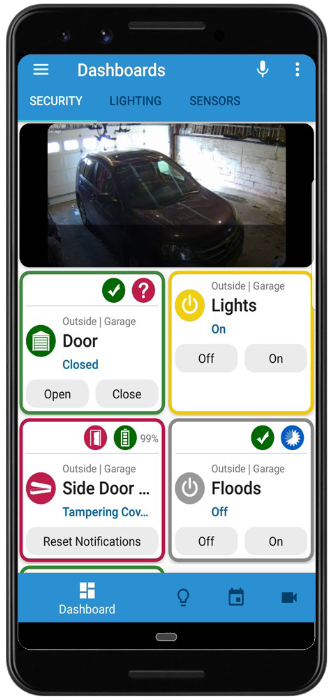
Download and install our HomeSeer Mobile app onto your Android or iOS mobile device. With HomeSeer Mobile, you’ll be able to control your smart devices, launch your HS4 events and access your cameras. You’ll also be able to create custom dashboards for easy access to your most commonly used devices.
Connecting to HS4
- Launch HomeSeer Mobile and select the option to Log in to MyHS
- Enter your MyHS account credentials and tap Remember Me if you don’t wish to log in each time you run the app.
- Tap Log In and you will be connected to your system.
Download HomeSeer Mobile from the appropriate app store.
For more information, Learn more about HomeSeer Mobile.


