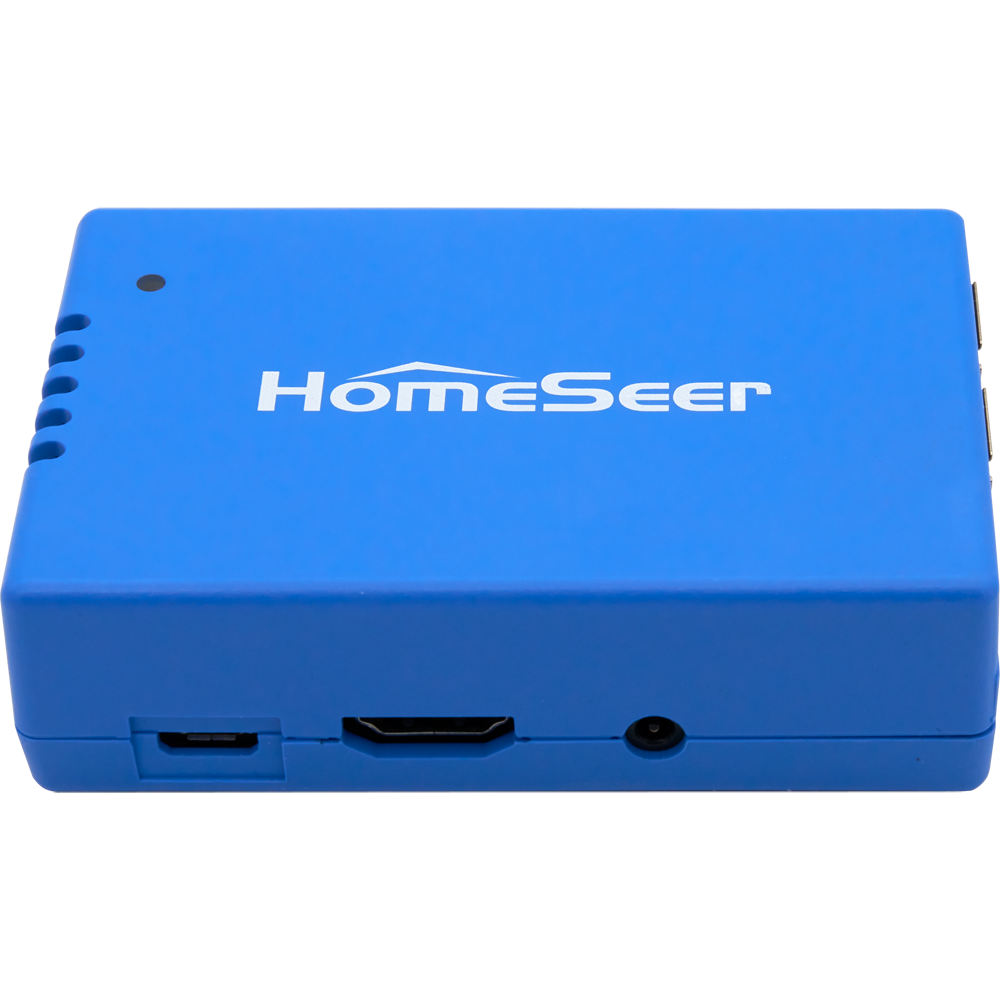
The HomeTroller Pi G8 is a smart home hub based on HomeSeer’s HS4 smart home platform. Use this guide to quickly get up and running.
If you purchased HS4 software separately to build your own hub, refer to Quick Start Guide for HS4 instead
Installation
-
Unpack the HomeTroller Pi Hub and AC power supply. Connect an Ethernet cable to the unit and attach that to your router or network switch.
-
Connect the AC power supply to the unit and plug it in. Wait for the LED on the top panel to turn green. This may take a minute or two.
Access & Registration
-
From any device connected to the same network as your system (HomeSeer hub), open a web browser and navigate to HomeSeer’s system finder at find.homeseer.com. You should see an entry for your system. Click on that to access the hub and open the HS4 Registration Wizard.
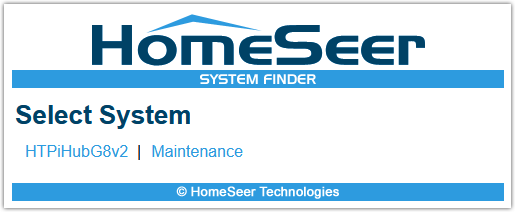
(system finder displaying HomeTroller Pi G8 system) -
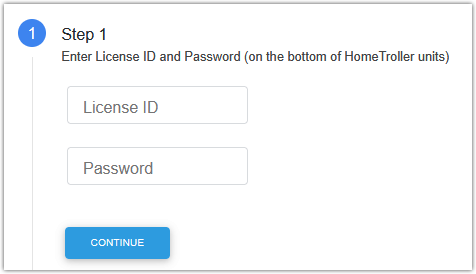
Enter your HS4 license codes (License ID & Password) and click CONTINUE. If your purchased HS4 software separately, your license codes will have been emailed to you. If you purchased a HomeTroller hub, they will be on a sticker on the bottom of your unit.
-
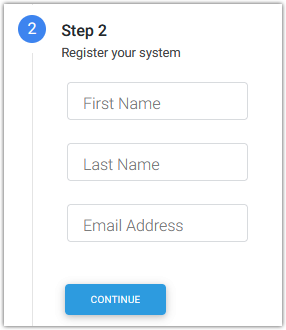
In the next step, you’ll be prompted to register the hub. Enter your First Name, Last Name and Email Address and click CONTINUE.
-
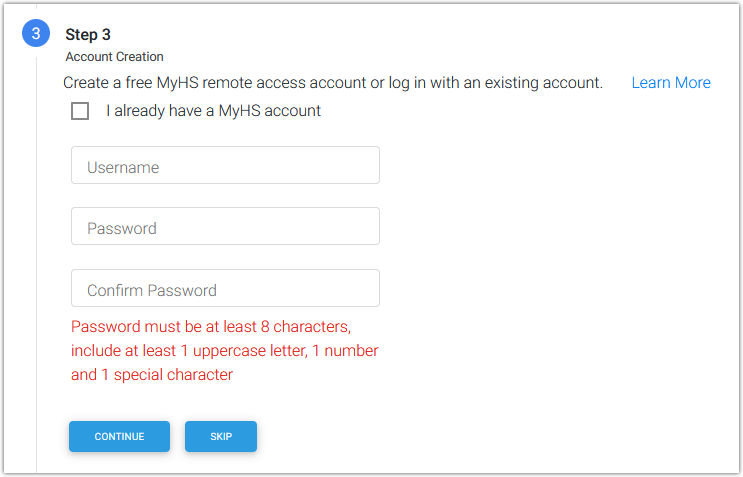
In the next step, you’ll be prompted to create a free MyHS remote access account. To do enter an email address into the Username field (you can use the same one as above to keep things simple), then enter and confirm a Password, then click CONTINUE.
-
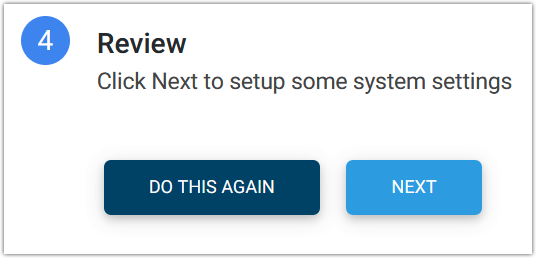
If you need to change any information, click DO THIS AGAIN. Otherwise, click NEXT.
-
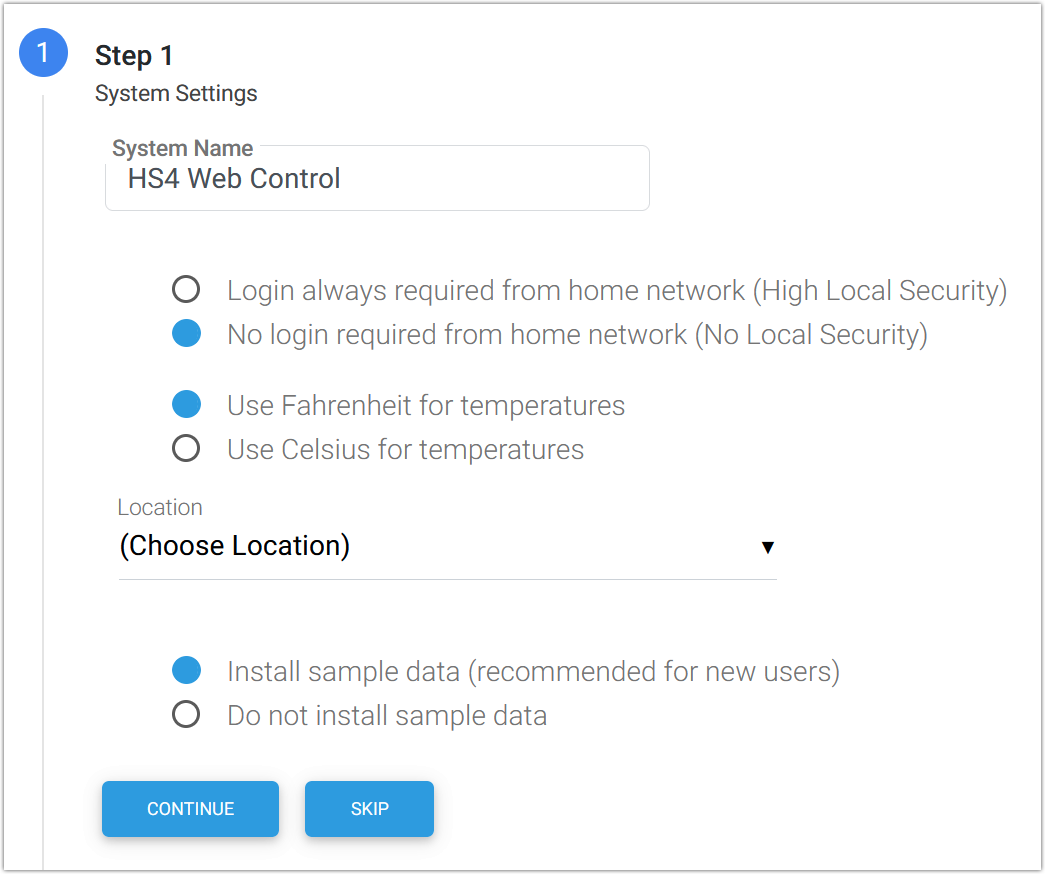
Next up is the Systems Settings page.
-
The default system name is HS4 Web Control. Enter a different name if you like or leave it as is. This can be changed later if you want.
-
Choose a Local Security setting to suit your needs for you local network. No Local Security allows quick access to the system without requiring a login. High Local Security requires a login for all local network access.
-
Choose the appropriate temperature scale for your area or region.
-
Open the Location menu and select a location that’s close to you. Don’t worry about being too precise here… you’ll be able to enter precise longitude and latitude in the HS4 settings later on if you like.
-
In the last step, choose from one of these two options and click CONTINUE:
-
Install sample data if you’re new to HomeSeer and would like to trial the program with usable sample devices and events.
-
Do not install sample data if you’re already familiar with HomeSeer and are ready to set up and configure your system.
-
-
-
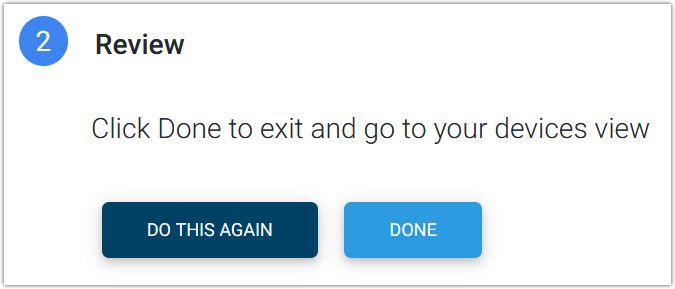
Click DONE to finish or DO THIS AGAIN if you need to make any changes. When done, the Devices page will appear. If you’ve installed sample data, sample devices will appear. Otherwise the page will be empty and ready for you to move to the next section.
Installed Plugins (integrations)
Because HomeTroller Pi G8 includes a built-in Z-Wave wireless interface, we’ve pre-installed and enabled the Z-Wave Plus software plugin. You may or may not have to configure this plugin based on when you ordered your HomeTroller Pi G8 hub.
-
If you ordered your hub on or after 3/25/26, you Z-Wave Plus plugin is already configured and ready to be used.
-
I you ordered your hub before 3/25/26, you’ll need to configure the Z-Wave Plus plugin to connect to the hubs built-in Z-Wave interface.
-
👉 Navigate to the Z-Wave Plus setup guide to get started with Z-Wave Plus.
The Zigbee Plus plugin has also been installed but has not been enabled. If you’d like to control Zigbee devices, you’ll need to add a compatible Zigbee interface (like our SmartStick ZB).
-
👉 Navigate to the Zigbee Plus setup guide to get started with Zigbee.
Navigation Overview
HS4 is a mobile friendly web application that’s designed to be used on any browser-equipped device. All of the essential functions of the program may be accessed from the main navigation bar at the top of the screen.

-
Devices: Click here to add, remove and edit your smart home devices. Learn More
-
Events: Click here to manage your smart home events (automations). Learn More
-
Cameras: Click here to view live camera feeds and to watch recordings. Learn More
-
Setup: Click here manage various system settings. Learn More
-
Tools: Click here to access or manage timers, counters, backup, log and more. Learn More
-
Plugins: Click here to manage HS4 integration plugins. Learn More
Plugins
Plugins are software programs that allow HS4 to integrate with smart devices and technologies. For example, if you’re using a Z-Wave wall switch and a Zigbee door sensor, you'll need to install both the Z-Wave Plus and Zigbee plugins. Visit Setup Guides for Plugins to learn more about setting up our free HomeSeer plugins. To browse the complete list of all plugins, visit the plugins section of our shop. Visit Installing Plugins for more information on adding plugins to your system.
Creating Devices
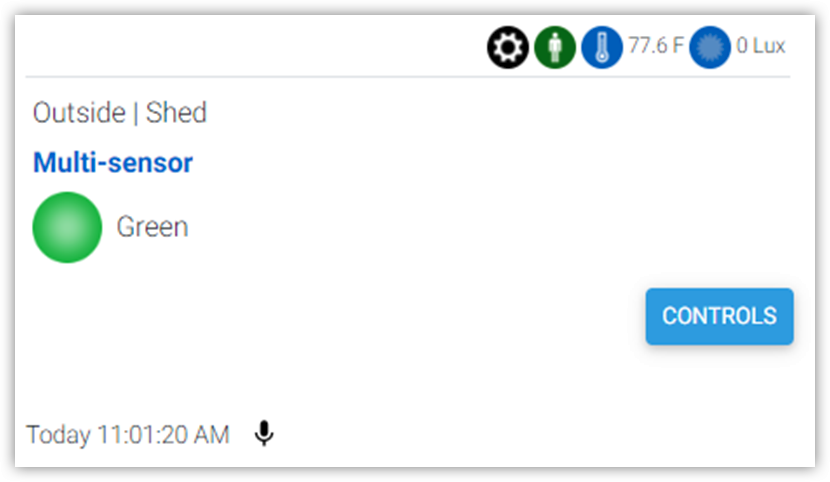
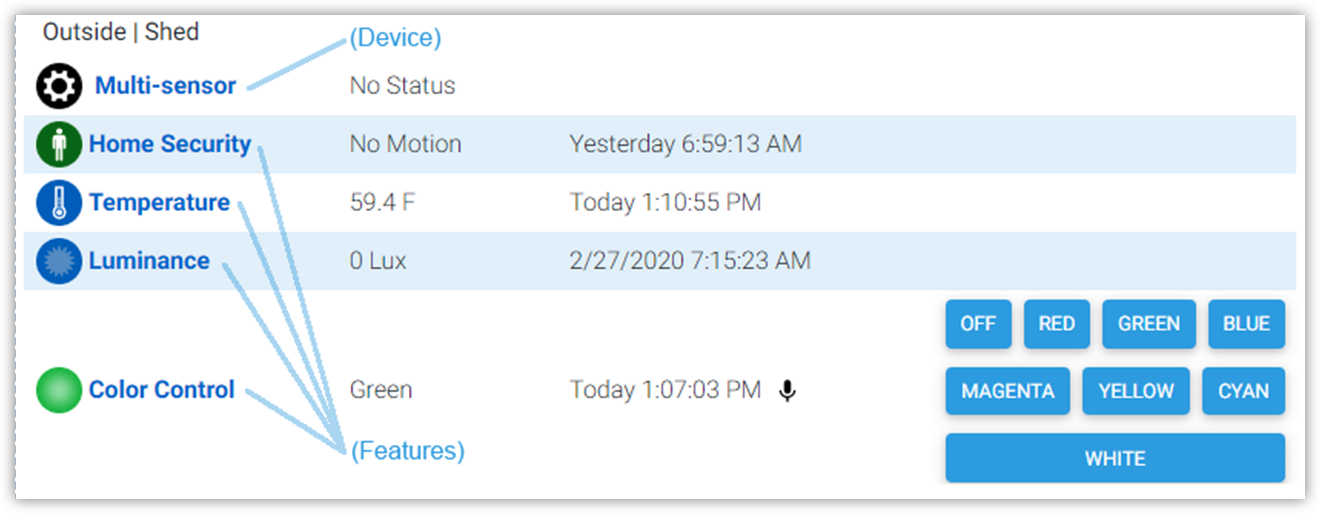
Devices are the fundamental building blocks for any HS4 system. When you add any smart product to your system, a corresponding device is added to the software. Device attributes will display as Features Some features are controllable and some will simply display values or status. When you turn the device on or off, your smart product will turn on or off. Here is what a multi-sensor device would look like in the HS4 device list & grid views:
Grid View
List View
Since devices are added by using the controls and procedures engineered into each plugin, you will need to refer to the plugin documentation for more information regarding this.
For more information, Learn more about devices.
Creating Events
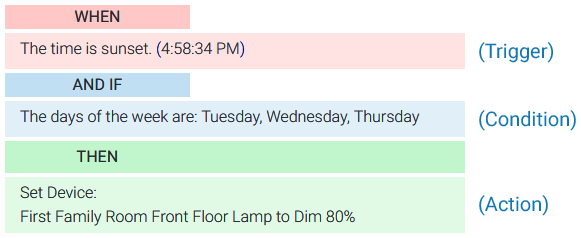
Events are rules that work to automate the smart devices in your home. Each event is comprised of at least one Trigger and one Action. You may also apply Conditions to any trigger. In the example here, a living room lamp is turned on at sunset on Tuesdays.
For more information, Learn more about events.
Using MyHS for Remote Access & Integrations
Our MyHS Lite (Free) service provides remote access to your HS4 system and MyHS Plus & PRO (Premium) plans work with other cloud services such as Amazon Alexa, Google Home and IFTTT. MyHS Lite is free to all users. Premium paid plans are also available for users who need additional features. Learn More About MyHS Premium.
Registering a New Account
-
Visit myhs.homeseer.com and click Register. Use the SAME email address & password as your HS4 web user account. Enter your HS4 license ID and password. This will become your primary license.
-
You will receive a verification email with a link inside. Once you click this link, you will be able to log in and connect via the MyHS web page. If you do not receive the email check your SPAM folder.
Updating an Existing Account
If you already have a MyHS account (for HS3), you can update that account for HS4 with the steps below.
-
Visit myhs.homeseer.com, enter your credentials, then select Manage Account.
-
Click Change Primary System. Select this and you will be prompted for your old license ID and password combo as well as the new one. If you do not recall your license ID and password, that information can be recovered in the Software Licensing Issues section.
HomeSeer Mobile App
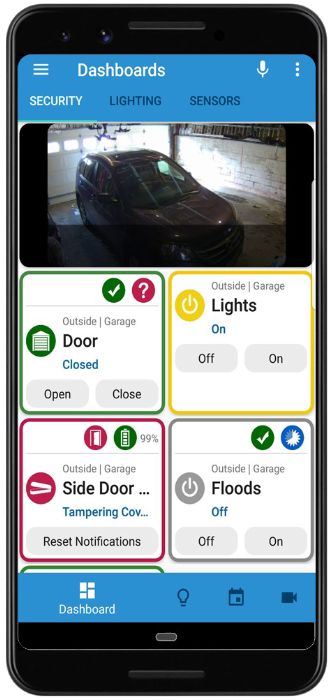
Download and install our HomeSeer Mobile app onto your Android or iOS mobile device. With HomeSeer Mobile, you’ll be able to control your smart devices, launch your HS4 events and access your cameras. You’ll also be able to create custom dashboards for easy access to your most commonly used devices.
Connecting to HS4
-
Launch HomeSeer Mobile and select the option to Log in to MyHS
-
Enter your MyHS account credentials and tap Remember Me if you don’t wish to log in each time you run the app.
-
Tap Log In and you will be connected to your system.
Download HomeSeer Mobile from the appropriate app store.

|

|

|
For more information, Learn more about HomeSeer Mobile.