Use this guide to fine tune the sensitivity of the PS100 to your room or area.
Overview
By default, the PS100 is configured to detect motion up to 4.9 ft (150 cm) away. This allows for easy testing of the presence / no presence status. Once you’ve tested the unit, you will need to re-configure it to work properly in your room or area with instructions below.
Adjusting Sensitivity
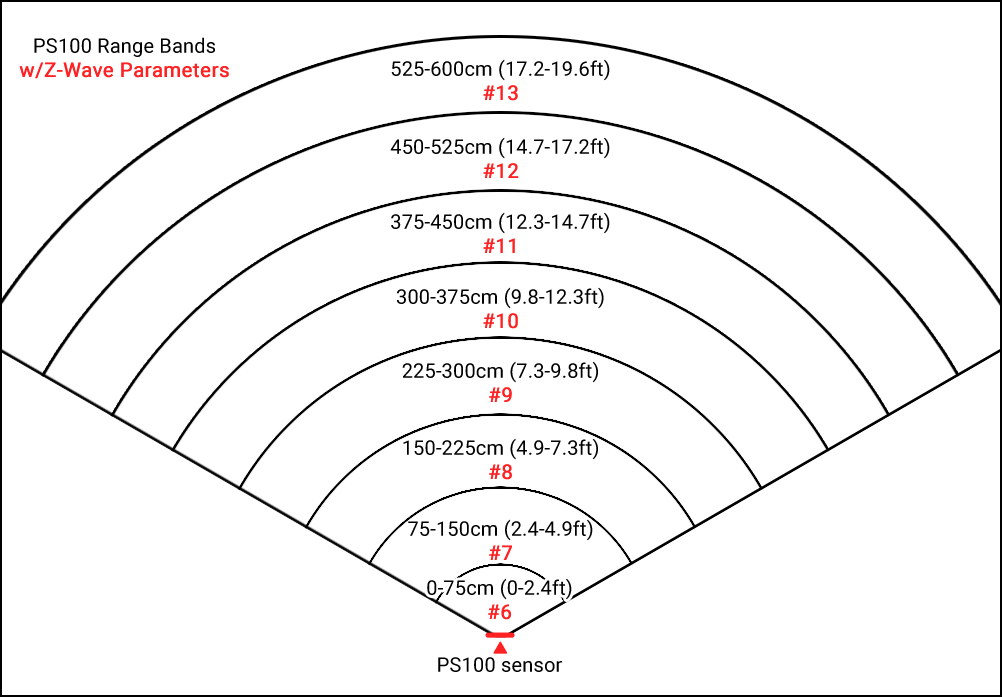
PS100’s key setting is sensitivity, which can be adjusted independently across 8 distance ranges (shown in the diagram below). Each range is assigned a Z-Wave parameter, indicated by the red number. For example, to adjust sensitivity for the 300–375 cm range, you would modify Z-Wave parameter #10.
Each range supports the following values:
-
0 = disabled (no detection)
-
1–100 = sensitivity level (higher values = greater sensitivity). Note that if you select “100” the sensor may stay in the “Presence” state, depending on your environment. Start with lower settings to avoid this behavoir. Normally, 90 works as the most sensitive setting in most environments.
-
See PS100 Specs & Z-Wave Parameters for a complete list of parameters before proceeding below.
For best performance, you may need to fine-tune these settings. Increasing sensitivity can improve detection at longer distances, while lowering sensitivity at closer ranges can help reduce false triggers. In some cases, it may be helpful to reduce or disable sensitivity in specific ranges where movement from fans, air filters, or other devices could cause false detections.
In short, the two most important factors to adjust are distance and sensitivity.
Steps
-
Define the usable detection area
-
Start by identifying the actual physical space you want the PS100 to monitor.
-
Measure or estimate the maximum useful detection distance in the room or area.
-
Compare this to the sensor’s full range (all 8 distance bands).
-
-
-
Disable unused distance ranges
-
If the room is smaller than the sensor’s maximum range:
-
Set all distance ranges beyond the usable area to 0 (disabled). This prevents detection of motion outside the intended space.
Example: If the room only requires up to 375 cm of coverage, disable all ranges above 375 cm.
-
-
-
Identify potential false trigger sources
-
Look for anything within the active detection range that may cause unwanted triggers, such as:
-
Ceiling fans
-
Air purifiers or HVAC vents
-
Curtains or hanging objects that move
-
Pets moving in limited ranges
-
-
-
Adjust sensitivity per range
-
For each affected distance band, adjust the sensitivity value (0-100)
-
Reduce sensitivity (lower value) if you want to reduce false detections.
-
Increase sensitivity (higher value) if motion is not being reliably detected.
-
-
-
Balance near vs. far detection
-
Fine-tune based on behavior:
-
Increase sensitivity in farther ranges if detection is weak at distance.
-
Decrease sensitivity in closer ranges if detection is too aggressive or noisy.
-
-
-
Test and iterate
-
After changes:
-
Observe real-world performance for a period of time.
-
Adjust individual ranges as needed.
-
Expect some iteration to reach optimal stability.
-
-