Use this guide to configure your openHAB hub to work with the Z-NET PRO Z-Wave & Zigbee network interface.
Overview
Z-NET PRO is a network-connected interface that’s designed to send and receive wireless commands to and from Z-Wave and Zigbee smart home devices. This guide will cover the steps required to use Z-NET PRO with openHAB’s native Z-Wave & Zigbee integrations through zigbee2mqtt.
Note, as of this writing the native openHAB Zigbee binding does not support rfc2217 for Ember coordinators.
Initial Setup
This guide requires your Z-NET PRO to be initialized and connected to your home’s local area network (LAN). If you’ve not already done this, please refer to the Quick Start Guide for instructions.
The following assumes familiarity with openHAB and it’s concepts. If you are new to openHAB, please review the Getting Started Tutorial which provides detailed instructions and examples covering how to achieve the steps outlined below.
Z-Wave
There are two options for integration of Z-Wave with openHAB: the native binding or Z-Wave JS.
Native Binding
Install the Z-Wave add-on from MainUI → Add-on Store → Bindings. Create a Z-Wave Controller Thing by navigating to MainUI → Settings → Things → + → Z-Wave Binding → Z-Wave Serial Controller. Use tcp://<ip address or hostname of Z-Net PRO>:2001 as the Port Configuration .
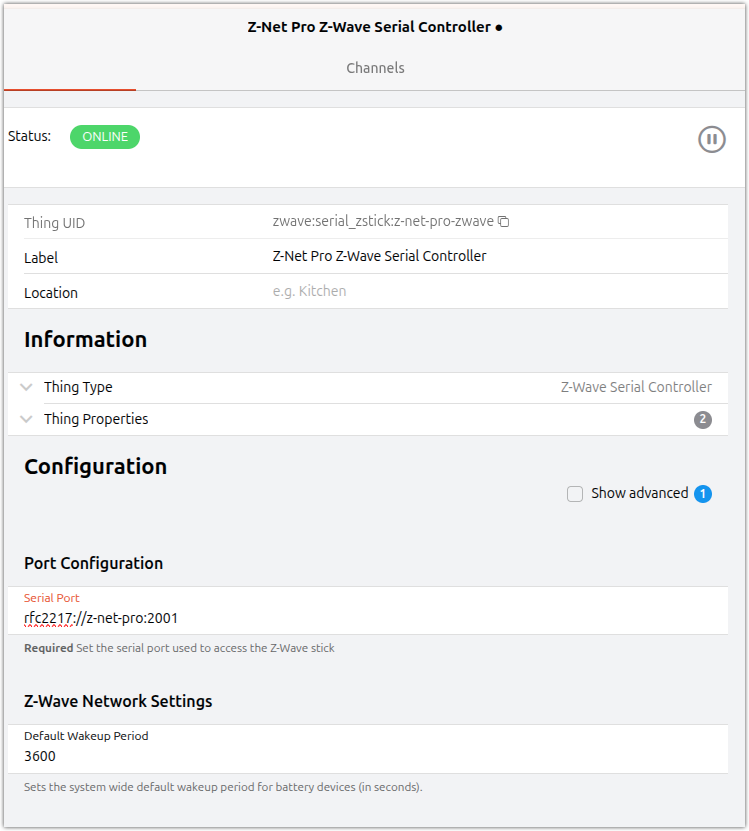
Upon saving the Thing should reach “ONLINE” status. If it reaches an error status, see openhab.log or MainUI → Developer Tools → Log Viewer for errors. Ask for help on the openHAB forum if you cannot resolve the error on your own.
Devices already paired with the controller will be discovered and Things created and put in the inbox automatically. Navigate to MainUI → Settings → Things → Inbox to see the discovered Things and accept them from the inbox.
New devices can be added by navigating to MainUI → Settings → Things → + → Z-Wave. This puts the controller into pairing mode. Take what ever action on the device needed to pair it with the controller. A new Thing will appear which can be accepted. See ZWave - Bindings | openHAB for details.
A note about device support: All Z-Wave devices can be supported. However, the openHAB binding depends on a database so if a device appears as “Unknown” (for battery devices it may require waking the device up a few times) it may need to be added to the database. Instructions are in the Z-Wave binding docs.
Z-Wave JS
See Z-Wave JS - Bindings | openHAB for details. Those running openHABian may have an option to install Z-Wave JS from openHABian-config . A link to instructions for installation and configuration of Z-Wave JS is in the Z-Wave JS binding docs linked to above. For the Serial Port property, use tcp://<ip address or hostname of Z-Net PRO>:2001.
Once Z-Wave JS is installed and configured to connect to the Z-Net Pro, isntall the Z-Wave JS binding from MainUI → Add-on Store → Bindings. Once installed, create the Z-Wave JS Bridge Thing by navigating to MainUI → Settings → Things → + → Z-Wave JS Gateway. Set the Hostname with the network address and Port to the Z-Wave JS web socket. All the paired devices should be automatically discovered and put into the Inbox.
To add new devices to your Z-Wave network you must use Z-Wave JS. Once a device is added to the controller openHAB will disover it and add it to the inbox. Navigate to MainUI → Settings → Things → Inbox to accept them.
Zigbee
See Z-NET PRO Integration with Zigbee2MQTT | HomeSeer Docs for instructions on how to configure Zigbee2MQTT to work with the Z-Net Pro. When configuing Zigbee2MQTT to work with openHAB, there are a few fields which are important to configure during the onboarding process:
-
front end
-
enabled
-
host: 0.0.0.0
-
-
HomeAssistant
-
enabled
-
experimental event entities: true
-
-
advanced
-
output: attribute and JSON
-
On openHAB install the Home Assistant - Bindings | openHAB) binding by navigating to MainUI → Add-on store → Bindings. This will also install the MQTT - Bindings | . Once installed create the MQTT Broker Things by navigating to MainUI → Settings → Things → + → MQTT → MQTT Broker and fill out the information to connect to your MQTT Broker set up above when installing and configuring Zigbee2MQTT.
The HomeAssistant binding will automatically discover all the devices published under the homeassistant prefix on the broker. Navigate to MainUI → Settings → Things → Inbox and accept the discovered devices.
Note, if you change the name of the device in Zigbee2MQTT, the discovered thing will bear that name making it easier to track compared to the randomly generated device IDs.
In the rare cases where the Home Assistant binding does not work properly with a given device, make sure that the output option in Zigbee2MQTT is set to attribute and JSON. This will cause Zigbee2MQTT to publish each property to it’s own MQTT topic instead of using combined messages encoded in JSON. Then, using a tool like MQTT Explorer inspect the network traffic Zigbee2mqtt is publishing to the MQTT broker. Using the information you find there, navigate to MainUI → Settings → Things → + → Generic MQTT Thing and configure Channels to publish and subscribe to the appropriate topics for that device. This is a lot more work, but it gives you finer control over how the device appears in openHAB and can work around limitations of the Home Assistant binding.
Many thanks to openHAB foundation member Richard Koshak for his assistance with this doc. Please visit the openHAB community forum for help and assistance with openHAB Z-Wave & Zigbee integrations.