Information on managing Z-Wave networks in the Z-Wave Plus Plugin
Overview
This function allows users to create and manage their Z-Wave networks and is typically the first thing that’s done when setting up the Z-Wave Plus plugin. If you’re just getting started with Z-Wave Plus, refer to Setting Up the Z-Wave Plus Plugin for information on setting up your Z-Wave network.
Add a Z-Wave Network
Complete the steps below to add a Z-Wave network to your HS4 system.
-
Install and enable the Z-Wave Plus plugin using the procedure outlined in Installing Plugins
-
Navigate to Plugins > Z-Wave Plus > Mange Networks and click ADD NEW NETWORK.
-
The Add a Z-Wave Network will appear. Follow these steps:
-
Instance Type: Leave set to Automatically* and click CONTINUE
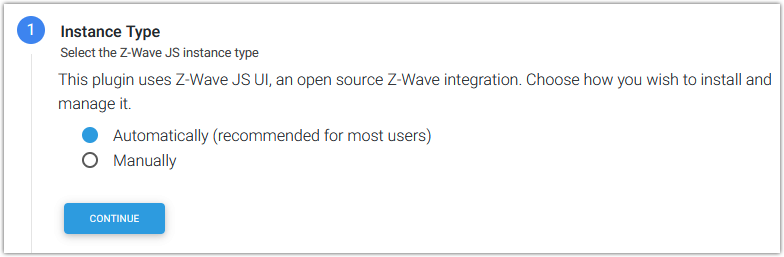
*If desired, it is possible use a Manually installed instance of Z-Wave JS UI but HomeSeer does not provide support for that procedure.
-
Settings:
-
Network Name: Enter a network name of your choice. If unsure, just enter “SmartStick”, “Z-NET” or something similar.
-
Connection Type: Select from the following:
-
USB - Most Z-Wave USB stick controllers
Then choose the serial port assigned to your USB stick -
Network (TCP) - for network connected controllers
Then enter the URL for your network connected controller -
Z-NET - for HomeSeer Z-NET or Z-NET PRO controllers
Then select the Z-NET from the drop down list -
Internal - for HomeTroller Pi hubs with internal Z-Wave controllers
Then select the serial port assigned to your internal controller
-
-
RF Region: Select the region that you’re in or are closest too (typically). This will determine the frequency that your Z-Wave network will operate on.
-
-
-
For the Security Keys Configuration, choose from the following, then click CONTINUE
-
Generate random security keys
Select this if you’re building a Z-Wave network from scratch
-
Import security keys from legacy Z-Wave plugin
Select this if converting from the legacy Z-Wave plugin to Z-Wave Plus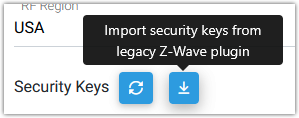
-
Enter security keys manually
Select this if moving a Z-Wave network from another system to Z-Wave Plus
-
-
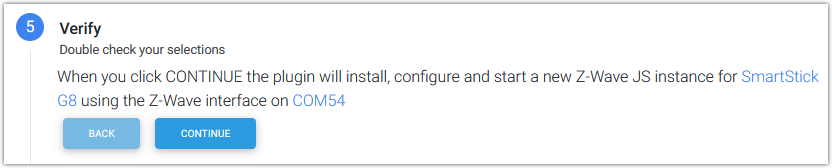
The Verify step will summarize your settings. If everything looks right, click CONTINUE. If not, click the BACK button(s) and edit the settings as needed.
-
Once the network has been created, click FINISH.
Adding Multiple Networks
As mentioned above, most users will only need to manage one Z-Wave network. However, with larger properties or properties with outbuildings, it may be necessary to use multiple Z-Wave interfaces. In those cases, the steps above will need to be repeated as follows:
-
Navigate to Plugins > Z-Wave Plus > Manage Networks.
-
Scroll to the Status section at the bottom and click the ADD NEW NETWORK button.

-
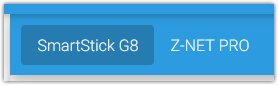
This will open the Add a Z-Wave Network stepper again. Follow the steps (as above) to create your new Z-Wave network. When finished, that new network will display in the blue bar at the top. In this example, two networks are shown with the SmartStick G8 network selected:
Editing Networks
Once networks are created, it’s not generally necessary to make changes to them. However, all of the fields or attributes of your networks may be edited easily on this page at any time.
To edit a network,
-
Select the network from the blue bar at the top (if you have more than one network).
-
Edit the fields that need changing.
-
Click the SAVE button at the bottom of the section.
Deleting Networks
To delete a network,
-
Select the network from the blue bar at the top (if you have more than one network).
-
Click the DELETE NETWORK button in the Status section at the bottom.
-
Click YES to the warning that pops up to delete the network.