Installation and setup guide for the PS100 V2 Z-Wave presence sensor that incorporates 2 RGB LEDS.
Picture of V2 sensor and mount
Overview
PS100 is a compact, easy to install presence sensor that uses mmWave radar technology to sense motion. It is designed to control other Z-Wave devices directly or it may be used with a variety of Z-Wave compatible hubs to launch events (automations). The V2 version adds a second RGB LED. The 2 LEDS can be set to different colors independently.
Applications
-
Control Z-Wave wall switches or plug-in modules when motion is sensed and/or not sensed.
-
Trigger events (automations) when motion is sensed and/or not sensed.
Configuration
PS100 may be powered with most USB C adapters (not included). The unit includes a Z-Wave network button on the back and an RGB LED operation indicator glows through the front of the enclosure. A separate mount is included for easy installation.
Physical Installation
For wall installation, attach the mount to the desired location using the included wall mount. Peel off the top of both sides of the mount to reveal the adhesive. Attach one side to the sensor and the other side to the mounting location. Then attach the USB C power cable.
Alternately, PS100 may be placed on a flat surface like a shelf or dresser. Attach it to the mount and place it where you like.
Z-Wave Network Installation
PS100 G8 may be included as a secure or non-secure Z-Wave device. Refer to your hub’s manual for instructions on including or excluding Z-Wave devices.
-
Inclusion
-
Put your hub into Z-Wave ‘inclusion’ mode.
-
Press and release the sensor’s Z-Wave network button. Monitor your hub’s app and wait for the inclusion process to finish.
-
-
Exclusion
-
Put your hub into Z-Wave ‘exclusion’ mode.
-
Press and release the sensor’s Z-Wave network button. Monitor your hub’s app and wait for the exclusion process to finish.
-
-
Factory Reset (Use this procedure to reset PS100 G8 to factory settings when the Z-Wave controller is missing or inoperable or when the PS100 does not respond to Z-Wave commands).
-
Press and hold the Z-Wave network button for 30 seconds.
-
During inclusion, PS100 reports these feature to the hub
-
Home Security Notification (Motion detection, No Event)
-
General Purpose (detection distance in centimeters)
For best results with HomeSeer, use the Z-Wave Plus Z-Wave plugin.
The sensor uses standard Z-Wave command classes and should operate properly with any Z-Wave controller/software including Home Assistant and OpenHab.
If any of these features are missing, check with your hub maker to confirm that PS100 is fully supported.
Operation
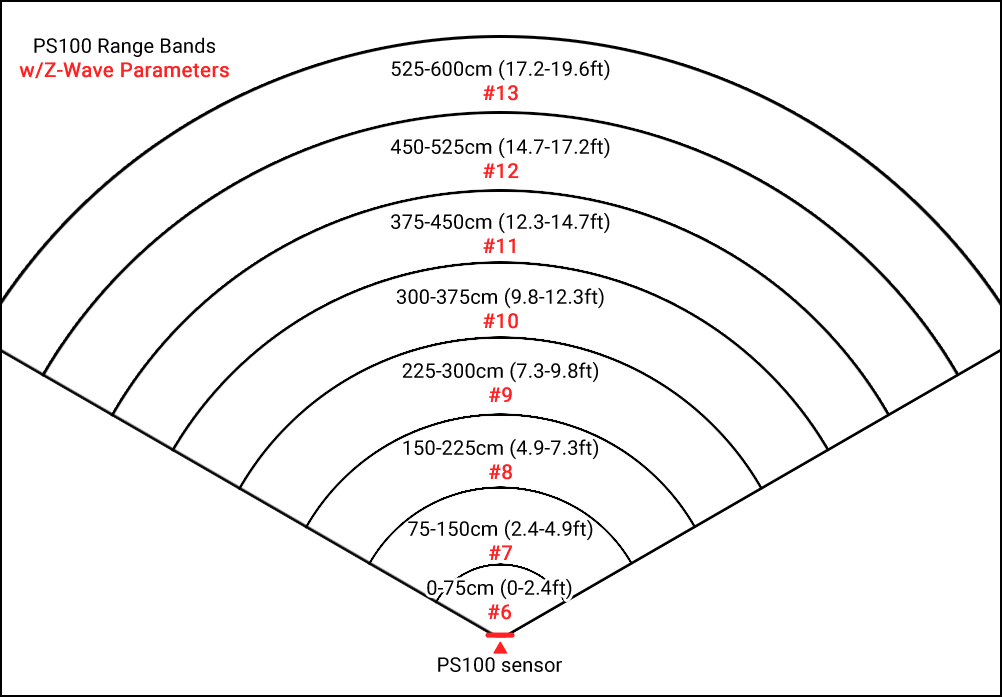
PS100 includes many settings which can be adjusted using Z-Wave parameters (see table below). The most important setting controls the sensitivity of the 8 different distance ranges illustrated in the diagram below. The following values may be set independently for each range: 0 = disabled (no detection), value 0-100 for the sensitivity in that range. Higher values indicate higher sensitivity.
Depending on performance, it may be necessary to increase sensitivity to improve detection at greater distances while reducing sensitivity at closer distances. It may also be necessary to reduce or disable sensitivity in ranges where fans, filters or other appliances may cause false detections. Some experimentation may be required.
HomeSeer HS4 users can adjust the settings by accessing the Z-Wave (or Z-Wave Plus) tab on the device page for the PS100. Other hub users can adjust the settings with Z-Wave parameters from the table below.
Z-Wave Association Information
PS100 G8 supports Lifeline and Basic Set associations. Using the Basic Set, PS100 may be associated with up to 5 other Z-Wave devices.
Z-Wave Parameters
Use the parameters below to adjust PS100 configuration settings
|
Number |
Description |
Range |
Size |
Default |
|---|---|---|---|---|
|
1 |
No Motion Timeout |
10-3600 seconds |
4 |
10 |
|
3 |
Bluetooth enable. Bluetooth is only used with a mobile app that can read information from the mmWave sensor. After changing this setting, the unit will need to be power cycled before it will take effect. |
0=disable 1=enable
|
1 |
0 |
|
4 |
Motion LED Enable
|
0=disable 1=enable
|
1 |
1 |
|
6 |
Range 0-75cm (0-2.4ft) Sensitivity |
0-100 where 0=disabled and 100 is most sensitive |
1 |
50 |
|
7 |
Range 75-150cm (2.4-4.9ft) Sensitivity |
0-100 where 0=disabled and 100 is most sensitive |
1 |
50 |
|
8 |
Range 150-225cm (4.9-7.3ft) Sensitivity |
0-100 where 0=disabled and 100 is most sensitive |
1 |
50 |
|
9 |
Range 225-300cm (7.3-9.8ft) Sensitivity |
0-100 where 0=disabled and 100 is most sensitive |
1 |
50 |
|
10 |
Range 300-375cm (9.8-12.3ft) Sensitivity |
0-100 where 0=disabled and 100 is most sensitive |
1 |
90 |
|
11 |
Range 375-450cm (12.3-14.7ft) Sensitivity |
0-100 where 0=disabled and 100 is most sensitive |
1 |
90 |
|
12 |
Range 450-525cm (14.7-17.2ft) Sensitivity |
0-100 where 0=disabled and 100 is most sensitive |
1 |
90 |
|
13 |
Range 525-600cm (17.2-19.6ft) Sensitivity |
0-100 where 0=disabled and 100 is most sensitive |
1 |
90 |
|
20 |
Left LED color
|
0=off
|
1 |
0 |
|
21 |
Right LED color
|
0=off
|
1 |
0 |
Latest Firmware
Version 0.8.0 changes
-
Changed the parameter values for the sensitivity to a range of 0 to 100 for finer control of the sensitivity.
-
Download version 0.8.0
JSON Device File for use with the HomeSeer V4 plugin. This gives better display of the parameters. Save this file in your HomeSeer folder under:
Data/Z-Wave/DeviceSettings
PS100 JSON Settings File
Please see the forum for discussions related to the firmware.
Specifications
|
Operating Temp Range |
0ºC to 40ºC | For indoor use |
|---|---|
|
Z-Wave Frequency | Range |
908 MHz (US) | Up To 300 Ft line of sight |
|
Power Supply |
USB C |
Limited Warranty
HomeSeer Technologies, LLC will repair or replace, at its option, any part of the device, which proves to be defective in workmanship or material under normal use, in the USA except in the states of Alaska or Hawaii, for a period of one year from the date the device is purchased. During the warranty period, HomeSeer Technologies, LLC will repair and provide all parts necessary to correct such defects, free of charge, provided the device has been operated in accordance with the manufacturer's guidelines. The Customer will return the device to HomeSeer Technologies, LLC for testing and repair or replacement. Should you need service, during warranty period or beyond, contact HomeSeer to obtain return authorization before shipping your device to HomeSeer Technologies, LLC.